Friday, November 30, 2012

Twelve Weeks of Homemade Gifts: Week Nine - Hour Apron Tutorial


Sorry about the delay for this tutorial. My little buddy Emily:


came in town and we were having too much fun to play on the computer.

Since I flaked out again, I decided to make the giveaway even bigger. Enter here by telling me your favorite movie, and I will let you choose your prize. You can win either design services for your Christmas Card, or ANY gift I made for the 12 Weeks of Homemade Gifts. Any of them. I'll ship them anywhere in the U.S. So get to entering, you have until Monday!

But, as promised here's a tutorial for this:

An apron!
This is a high-waisted skirt apron. Trying to take a semi-attractive selfy wearing the apron proved really difficult.

This all started with a little pin and a great tutorial here. The tutorial promises an apron in an hour, it took me 78 minutes on my first try, and 46 minutes on my second try. So, average of 62 minutes--golden. This project is also perfect for those of us that started our sewing career a month ago. Nothing but straight seams, aprons are easy to fit almost everyone, and the hardest part is ironing. Seriously.

What you'll need:

1 'Fat Quarter' (18x22") piece of fabric [this is for the body of the skirt]
1/2 Yard of fabric for the bottom and ties
Thread to match
Iron, sewing machine, scissors, [the usual suspects]


[Step One] Iron your fabric really well. Really really well.


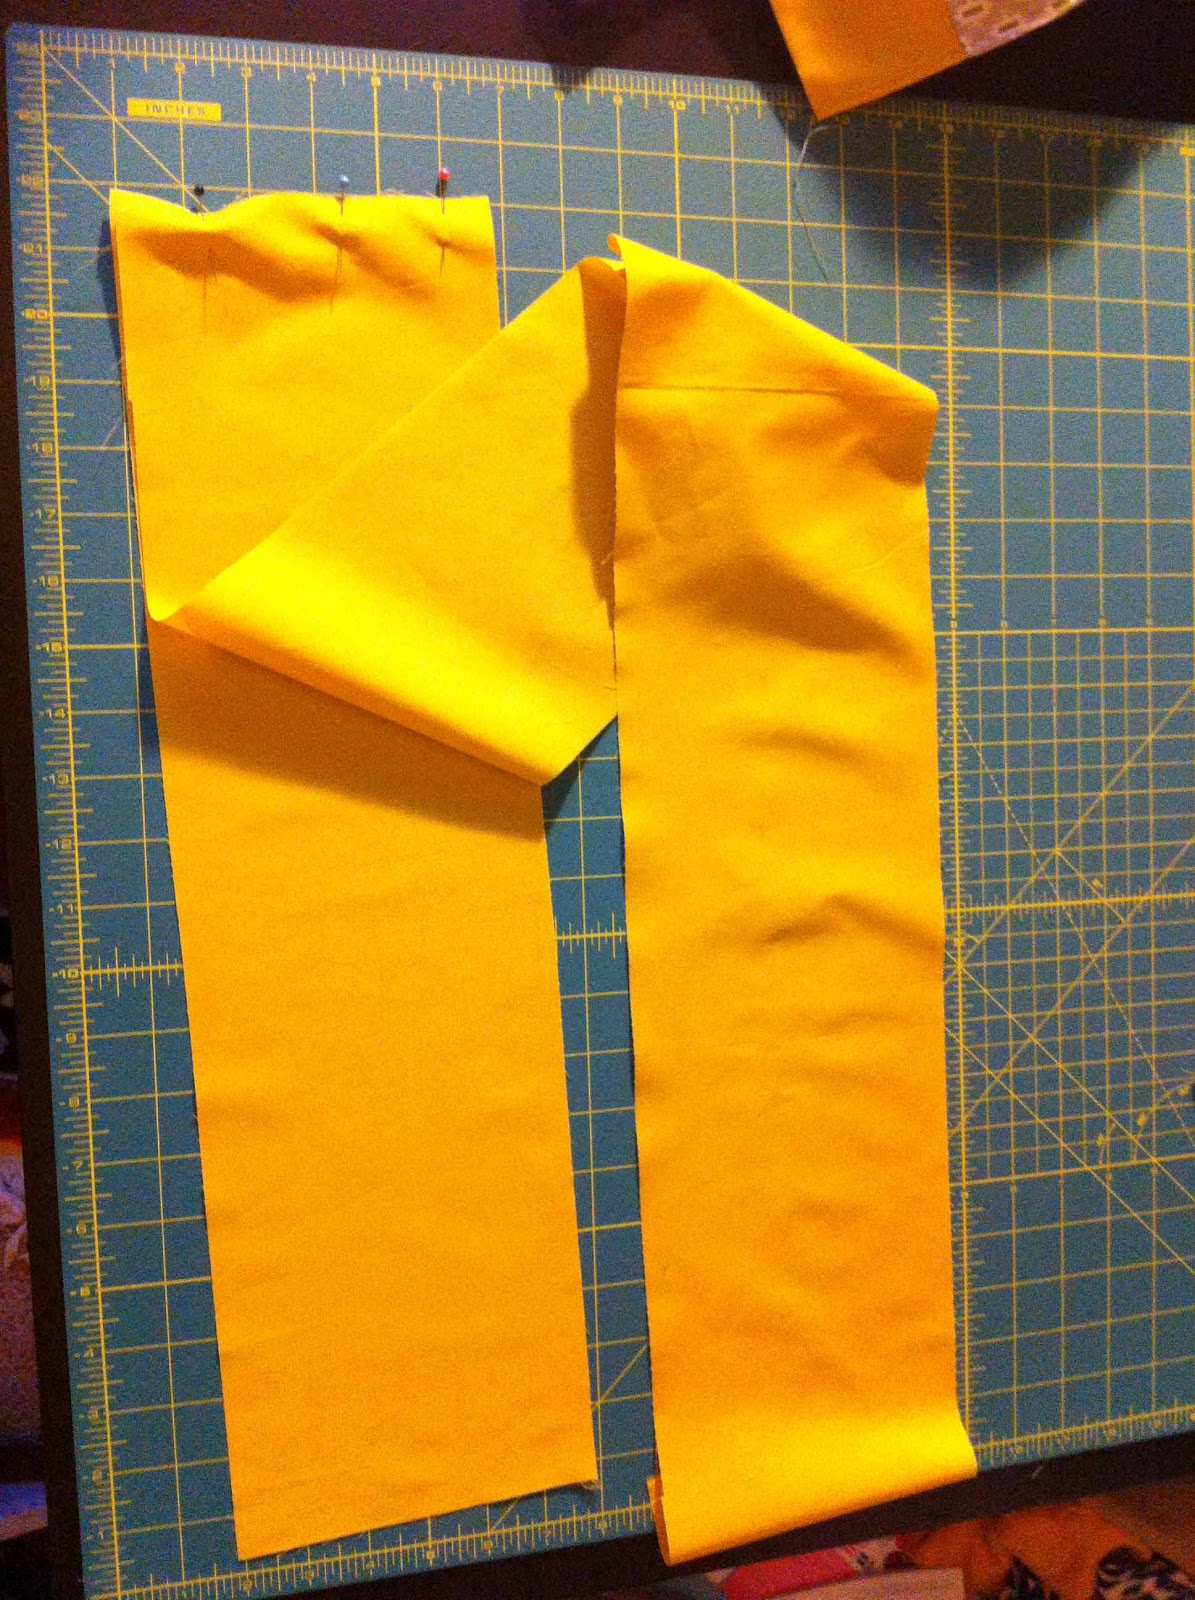
[Step Two] Cut your 1/2 yard of fabric [yellow in my case] into three equal strips, 6" each.


[Step Three] Line up your Fat Quarter with one of the strips. Cut the strip so it is the same length as your Fat Quarter [use the 22" side to measure]


[Step Four] Fold your shorter strip in half [hot dog] and iron it.


[Step Five] Take a deep breath. Step up to your sewing machine. Sew the 'right sides' together at the bottom of your Fat Quarter:


[Step Six] Iron your seam down flat [real crisp.]


[Step Seven] Deep breath, sewing machine again. Sew a straight line on the top of the seam...like this:


[Step Eight] Time to hem! Fold the long side of your apron over 1/4 inch, then iron. Now fold that over again, and iron. Now go to your sewing machine and sew that sucker down. Ends up looking like this:


[Step Nine] Do the same thing on the other side.

[Step Ten] Time to make the ties! Take one long strip and one short strip. Sew right sides together.


[Step Eleven] Sew your remaining long strip onto the open end of the shorter strip [right sides together again.

I ironed these seams flat, too.
I don't know if it made any difference in the end, but it made me feel better. 

[Step Twelve] Sew the short strip onto the top of your Fat Quarter:


[Step Thirteen] Now, we're going to finish the long ties. Fold the long strips in half [hotdog.] Leaving the middle open, sew right sides together. Stop about 2 inches from the end of the strip, angle your piece so that you are aiming for the corner to make a point. Repeat on the other end. Just make sure to leave the middles open.


Turn while the needle is down, then you won't lose your place


[Step Fourteen] Trim the pointy ends.

It was getting dark...sorry for the blur.

[Step Fifteen] Turn those suckers inside out and iron really well.


[Step Sixteen] Fold the middle apron piece over and sew using a pretty zig zag stitch.

I ironed this down before I started sewing.
Again, made me feel better.

Make sure to iron your seams after, too.
Makes it pretty. 
[Step Seventeen] Iron that sucker. Cut all your loose threads. Impress all your friends. You just made an apron.

Congrats!


Tuesday, November 27, 2012

Pinned it...DID IT!

[Programming note: you still have 6 more days to sign up for my giveaway! I'm giving away free design services for your Christmas Card this year! No, you do not have to live in Portland to win! Also--if you want to leave an anonymous comment, just sign with your name, and I'll notify you if you win on Monday! Sign up here.]

My new favorite guilty pleasure:

Seeing Pinterest attempts in real life.
BuzzFeed listed some great ones this week here.

Because let's be honest: we've tried that plastic spoon flower thing, and it turned out looking like this:


I even had my own Pinterest fight a couple weeks ago, and was too embaressed to show you anything but a pile of S%&^ that was left over from the fall. 

But today, I can proudly say, I pinned it, and I did it! YAHOO!!!

This weekend, I spied a little pin of a super cute skirt-style apron that claimed to only take an hour:

here

So on Sunday, I set out to make an apron. I have to admit, it took me 78 minutes [liars!] but it turned out AWESOME:


I'll show you the full tutorial tomorrow, yehaw!


Monday, November 26, 2012

Merry & Bright [a giveaway!]

Hello everyone!

Welcome to the "real" start of the Christmas season! Aren't you glad we started making gifts 8 weeks ago? [snicker snicker]

I have been in high-production-gear for the last two weeks getting ready for Christmas and the start of the new year [five weeks until hey, pretty launches!]

Since I've been a little flakey with my posts lately, I want to make it up to you by giving one lucky winner personalized Christmas Card design services...FOR FREE!

I'm calling this giveaway: Merry & Bright!


That's right, I will design your family's holiday cards this year...FOR FREE! [if you win]

All you have to do, is comment below telling me what your favorite holiday/christmas movie is. I'll give you two entries if you 'follow' my blog [button is on the right side bar.] So to recap, one entry for telling me that Elf is your favorite Christmas movie, and another entry for subscribing. Easy!

I'll pick a winner on Monday, December 3!

[Fine print: I will design them for you. But, you will have to print them, sorry. I'll design them so they can be easily printed at your favorite Costco or home desktop printer. Prize is for a total of two (2) hours of design-time. There will be only one winner, for now, I'll pick you using a random number generator. Winner will be chosen on Monday, December 3.  ]

Get to commenting!


Wednesday, November 21, 2012

Twelve Weeks of Homemade Christmas: Week Eight - Ring Holder!


Twas the night before Thanksgiving, right?

Ben is busy making a couple masterpiece pies [all by himself!] and I'm doing final preparations for the mashed potatoes. My mom has been prepping a feast for the last week, all the trimmings a major foodie would go for: rolls that take 3 days to make, dry-brined turkey to be cooked to perfection on a Traeger Grill, 3 types of stuffing [remember Mom, it's all about me!], green bean casserole, and a couple extra tricks she has up her sleeve. I'll share photos. That is, if I can still move...

This week marks week 8 [!!] of our adventure into homemade gifts: The Ring Holder. This is the perfect gift for a newlywed or bride-to-be. Actually, really for anyone you might think feels a pang of guilt every time they set their ring on the bathroom counter or side of the kitchen sink...get that rock a home!


Today's gift came from another stop to a Fuego-type store, in the Bride-to-Be section they had a 'ring holder.' Again, I thought, "twelve bucks? highway robbery!" So here we go!

You will need:
-One small frame
-Scrap of fabric big enough for your frame
-Scrap of batting big enough for your frame
-Floral pin, upholstery brad, or small tack [this is what will hold your ring, so think small, think pointy.]
-hot glue gun and scissors

First, you'll need a trip to Goodwill or your favorite thrift shop. Time to start digging. Perfect frames for this are those little baby 3x3" or smaller frames. I found two fun winners [for a grand total of $1.50!]


Now, raid your craft closet for a little bit of fabric and some batting [I had a ton left over from my upholstery project. The batting isn't extremely necessary, especially if your fabric is thick. It does give it a little plusher look...]

One of my frames came sans-backing or matting, so I had to improvise with a scrap of cardboard I had. This actually worked so well on my circle frame, I used cardboard on the other, too.

...and I had to do a little readjusting along the way...

Cut your batting and fabric to have about 1/2" allowance on each side of your cardboard.


Fire up that hot glue gun. Similar to my tutorial yesterday, glue your fabric and batting to the cardboard tightly. Corners aren't as important because they are going to be hidden.


Do the corners last, but just make sure the fabric is taught. No need to make any sort of fancy fold-y corners:


Your next step is dependent on what type of frame you have. If you have the kind that you are able to remove the back, stick your pin-of-choice (I used pearl floral pins) into the front of your fabric. Only let about 1/4" inch stick out from the fabric:


Bend the back so the pin stays put and has a strong base:


Stick that bad-boy in your frame! You are done!


If you can't remove the back, just put your fabric/cardboard into the frame and do the same, but bend your pin before putting it in.


This project can become 9000x more crafty if you want to DIY-deck out your frame. I liked the way these frames looked, but you can go crazy with beads, paint, seashells...you name it!


Running out to Goodwill now so that I can stock up on a couple frames...yee!

Tuesday, November 20, 2012

Tutorial Tuesday: Upholstering a Bench

Happy Tuesday, all!

This weekend, I finally got around to finishing my window seat by the fireplace:


Just for good measure, I'll remind you of the 'way before' picture:


And here's the 'just before' picture:


Sometimes I need to look at those, "this is where we came from" pictures to know that we have made a huge dent on our project load.

I scoured Pinterest for good tutorials on 'easy' upholstering, I didn't find much. So, I winged it. My methods worked really good for me, but I recommend doing a little research and maybe some practice before you embark on your own upholstery project.


I started out by measuring my bench size. I figured I needed about 1" of foam space on each edge, so I had my Dad [thanks, Dad!] cut a piece of 1/2" plywood. Then, I headed over to Joann's equipt with a 60% off coupon [don't ever buy anything there without a coupon, highway robbery at its finest] and bought a piece of 3" foam that would give me about 1.5" of room around my piece of plywood. 

Then, there's fabric and batting [batting is cotton-ey stuff that you put in a quilt, you'll need some high plush batting.] I measured my fabric to have at least 3" of room around the plywood. More is better, you could always trim. but, my fabric was expensive, so I rolled the dice

Just as an example, here are my dimensions:
  • Finished size needed to be 18x64
  • Plywood size was 16x62 [think, 1" less on each side]
  • Foam size was 19x65 [think, 1.5" room on each side of the plywood]
  • Fabric and batting size was 22x68 [think, 3" room on each side of the plywood]
Your foam doesn't need to be perfect, just close.

My stuff before the cutting
 Once you have everything cut, layer your fabric [right side down] then batting, then foam, then plywood:


Make sure you space everything evenly, this will make your next job easier:


Don't pay attention to how dirty my carpet is...
Now it's time to grab a staple gun. I bought a manual one from Harbor Freight for about $6.99. You just need something strong enough to punch into plywood. An electric one would be even better, but that one cost $20 and I'm cheap.

Start on one of your long ends. Pull your fabric and batting tight over the foam, paying attention to what the side of your bench is looking like. Once the side looks tight and not lumpy, staple that thing. Staple every 3-4" or so. Then continue down that end, but don't staple the corners yet.


When you're stapling, make sure to staple on one side of your fingers and not in-between.
If you staple in-between your fingers you'll get odd pulling marks on your fabric.
 Now, do the other side. I liked starting in the middle and moving down.


Now, do the short ends:


By this time, your arms are probably pretty tired. This was quite the work out. Take a break, drink a glass of wine, you deserve it. Come back for some creative corners.

Now flap out your corner like this:


Take the top of that triangle and staple it tightly into the plywood.

Now, fold the other legs of the triangle over so it looks like this:


Do all four corners, flip that bench over, and jump up and scream.

You did it!
Thankfully, my measurements were spot on and this bad boy fit perf.
The worst part of this project? Taking pictures of my one stenciling mistake over..and over...
and over...

I'm still figuring out the long-term pillow solution for this spot, but our couch cushions look pretty darn cozy up there!


Next stop: Window treatment, pillow solution and a big ol cup of tea while re-reading the Hunger Games.