Sorry about the delay for this tutorial. My little buddy Emily:
came in town and we were having too much fun to play on the computer.
Since I flaked out again, I decided to make the giveaway even bigger. Enter here by telling me your favorite movie, and I will let you choose your prize. You can win either design services for your Christmas Card, or ANY gift I made for the 12 Weeks of Homemade Gifts. Any of them. I'll ship them anywhere in the U.S. So get to entering, you have until Monday!
But, as promised here's a tutorial for this:
 |
| An apron! This is a high-waisted skirt apron. Trying to take a semi-attractive selfy wearing the apron proved really difficult. |
This all started with a little pin and a great tutorial here. The tutorial promises an apron in an hour, it took me 78 minutes on my first try, and 46 minutes on my second try. So, average of 62 minutes--golden. This project is also perfect for those of us that started our sewing career a month ago. Nothing but straight seams, aprons are easy to fit almost everyone, and the hardest part is ironing. Seriously.
What you'll need:
1 'Fat Quarter' (18x22") piece of fabric [this is for the body of the skirt]
1/2 Yard of fabric for the bottom and ties
Thread to match
Iron, sewing machine, scissors, [the usual suspects]
[Step One] Iron your fabric really well. Really really well.
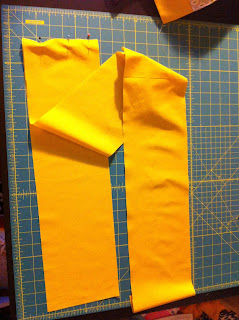
[Step Two] Cut your 1/2 yard of fabric [yellow in my case] into three equal strips, 6" each.
[Step Three] Line up your Fat Quarter with one of the strips. Cut the strip so it is the same length as your Fat Quarter [use the 22" side to measure]
[Step Four] Fold your shorter strip in half [hot dog] and iron it.
[Step Five] Take a deep breath. Step up to your sewing machine. Sew the 'right sides' together at the bottom of your Fat Quarter:
[Step Six] Iron your seam down flat [real crisp.]
[Step Seven] Deep breath, sewing machine again. Sew a straight line on the top of the seam...like this:
[Step Eight] Time to hem! Fold the long side of your apron over 1/4 inch, then iron. Now fold that over again, and iron. Now go to your sewing machine and sew that sucker down. Ends up looking like this:
[Step Nine] Do the same thing on the other side.
[Step Ten] Time to make the ties! Take one long strip and one short strip. Sew right sides together.
[Step Eleven] Sew your remaining long strip onto the open end of the shorter strip [right sides together again.
 |
| I ironed these seams flat, too. I don't know if it made any difference in the end, but it made me feel better. |
[Step Twelve] Sew the short strip onto the top of your Fat Quarter:
[Step Thirteen] Now, we're going to finish the long ties. Fold the long strips in half [hotdog.] Leaving the middle open, sew right sides together. Stop about 2 inches from the end of the strip, angle your piece so that you are aiming for the corner to make a point. Repeat on the other end. Just make sure to leave the middles open.
 |
| Turn while the needle is down, then you won't lose your place |
[Step Fourteen] Trim the pointy ends.
 |
| It was getting dark...sorry for the blur. |
[Step Fifteen] Turn those suckers inside out and iron really well.
[Step Sixteen] Fold the middle apron piece over and sew using a pretty zig zag stitch.
 |
| I ironed this down before I started sewing. Again, made me feel better. |
 |
| Make sure to iron your seams after, too. Makes it pretty. |
Congrats!


No comments:
Post a Comment