Tuesday, July 31, 2012

Tutorial Tuesday: Make your own custom iPhone Lock Screen

Welcome to Tuesday.

Several of you (17% of you...to be exact) look at my blog on your iPhone. 5% of you look at this on your Android. Aren't analytics grand? [Don't worry, I can't see who you are, how many times you visit, or even exactly where you live. So keep coming back, often.]

I've had a couple requests through the last months about using myimages as their iPhone screens or backgrounds. I think that is awesome.


But, I'm sure you would love to make your own custom background, too. So here we go--a tutorial to make your own iPhone lock screen. (Instructions are probs similar for Android, but I don't touch those....soo...

OK, here's your lock screen. Nice.


Here's the dimensions of your lock screen. Awesome.

320 pixels x 480 pixels

Now, create a document in your favorite drawing software. You can use MS Paint, Corel, Illustrator, Photoshop...whatever. Just make sure your document is 320 pixels by 480 pixels. If you have the choice, make sure your color is in RGB (that's Red-Green-Blue, typically what monitors are. CMYK, CyanMagendaYellowBlack, is mainly what printers use.) Your resolution should be about 72 dpi (dots per inch...didn't know I'd be shooting so much designer-speak at you, right?)

I'm using Illustrator, but it's a similar process in MS Paint or Adobe Products

OK, we're there. Now, the fun part. Start coloring. 

Now remember, depending on your phone you have a time bar at the top, and an unlock slide on the bottom. For an iPhone, here are the dimensions of that...

I put little guides in Illustrator where the clock and slider live, made it lots easier. 

So set up a couple guides or bars so you don't put anything fun over those areas.

Done coloring? Great. Not done yet? We'll wait.


...


Well...I'm not entirely patient so catch up with us later.

You have your beautiful picture, and you're ready to put it up semi-permenantly on your phone. Great.

Save as a jpeg into your Pictures folder. [Save As > File Type> JPEG]

If I were you, I would just start creating a folder in your Pictures as 'Backgrounds.'

Now, go into your iTunes and make sure the folder you saved your pictures into gets synced into your Phone when you connect it to your computer.


Now, sync your phone. Easy.

Go into your System Preferences on your phone. Select  'Wall Paper'


Choose your new work of art...and VOILA! Custom Lockscreen Awesome!

Again, feel free to use this!
Seriously, it's free!


Monday, July 30, 2012

There's a theme here, somewhere.

[Hey guys, I'm back. Thanks for being patient with me this summer. But, I'm back FOR GOOD. No more breaks, a lot of catching up. Thanks again for being gentle.]

I love the Olympics.

Let me count the ways....

I love all Olympics. Winter, Summer, Special, Paralympic, and backyard birthday party Olympics. I love all the pageantry around it. I love how many people swarm into the Olympic villages.  I love the athletes tears as they hear their country's National Anthem played because of their amazing physical and mental achievement.

I was lucky enough to go to the Winter Olympics when they were in Vancouver in 2010. Look how cute we are:


In our defense, we asked for our picture to be taken in front of the torch by about 8 different people. All of them cut out the torch. This person asked us to hold their creepy teddy bear and some Canadian flags.

But, here's the torch:


So just imagine that sitting behind us.

I really wanted to go to London this year. Not just because of my favorite Olympics, but because my best bud Emilie is living in London for a year going to FILM SCHOOL. She also has a set of amazing parents that call me D10 [short hand for Daughter 10, I didn't want to be  D5 (or was it D6?) because 10 is my favorite number, and I have to be difficult if they are going to call me their Daughter.] But, with buying a house and hearing about the navigational craziness that has been London 2012, probs best I didn't go.

I really wanted to make an iPhone background to celebrate my favorite Olympics, but I'm kind of terrified to post anything up here with the Olympic Rings because of this, this or this. Even my main gal's family was investigated for copyright infringement. 

So, I'm posting this at a risk...but I've checked a bunch of legal stuff and I don't think I'm violating any copyright laws... But just to cover my bases. I am not selling any product to you. You can use this for free. Believe me, I make no money off this blog.

So first, click on the sound:


Now, enjoy!


Your very own phone background. To use it on your own phone, just open this page on your Smart Phone. Click on the picture and 'save' it. Then post it through your settings as your wallpaper and/or lock screen.

Tomorrow, I'll teach you how to make your very own themed iPhone or Android background. Cheers!

Thursday, July 26, 2012

Programming note.

Being gone last week really got me off my game. Unfortunately, I need to take a little break from the blog until Monday. Don't worry, I'm still in project-per-day heaven, just a little break from the blog.

I'm excited to tell you I'm in the middle of a HUGE top secret project. Not even Ben knows about it yet... And no, I'm not pregnant.

I'm hoping I can make a big announcement in August, but I don't want to jinx anything.


So for the time being, I give you a sneak peak of a cute little gift I'm working on for a cute little girl.

Tuesday, July 24, 2012

Oh, Tuesday.

Happy Tuesday, all!

Life is [almost] back to normal for the Reese household. This summer shall go down in the history as The Summer of Cray. On Friday, I turn right back around for a trip to Seattle for a wedding and bridal shower. Then, it's time for some serious floor installation and turning around for another wedding for my best bud/sister-in-law.

So, I'm tired. Really stinking tired.

But, we also have an amazing kitchen. An awesome, amazing kitchen that wants to be cooked in, used and dirtied. A million length feet of counter space. Agh. So beautiful.

I've started to collect a bunch of recipes that are quick, delicious and nutritious.

Tonight: Kebabs.

These aren't my kebabs, but I swear they looked close to this...kinda.
These are from Martha Stewart. Hate her.
Kebabs are perfect for weeknight grilling. You can use leftover veggies from last night's dinner, just about any cut of meat, and a quick marinade.

In fact, Martha Stewart gave me [and you] 30 recipes for kebabs. Here's some examples that look delicious.

Grilled Greek Chicken Kebabs with Mint-Feta Sauce

Pacific Pork Kebabs with Pineapple Rice


Pork, Apricot, and Red-Onion Kebabs

...and for those non-meat folks...

Tofu Kebabs with Cilantro Sauce

I think we need to try the Pork, Apricot, Red-Onion combo later this week...yum!

What's your go-to-summer-week-night-nom?

Monday, July 23, 2012

We're back!

Ben and I spent the last six days with 10 awesome high schoolers in New Orleans. We spent the week learning about peace, discipleship and justice. The trip was amazing, but Ben and I are beyond exhausted. Here's an Instagram round-up of our week:


Friday, July 20, 2012

Resources, a round up of sorts [part INSPIRATION]

Welcome to the third and final installment of my resources round-up. This is my most favorite thing to share, my INSPIRATION for the last month.

Ben and I have truly been through a whirlwind of awesome in the past month. Just a month ago we were apartment living, in total limbo on when our house would close and if we would EVER be able to play Just Dance without our neighbors banging on the ceiling with a broom.

So, my first source of inspiration: This guy.

yup.
He has been working incredibly hard to be ready [both mentally and professionally] for a big promotion. In the last couple weeks he transferred to a Starbucks that enjoys the fourth highest sales in the state and the flagship store for their district. He spent the last two weeks 'mastering' everything that cafe has to offer [if you know Ben, he doesn't 'learn' things, he 'masters' them.] He comes home everyday exhausted but incredibly enthusiastic and optimistic about where he is going with the company. There will be some big moves in the next six months for this guy, and all because of his hard work.


Second source: @TheFauxMilaniaG on Twitter


This is Twitter GOLD. For those of you that live under a giant rock or have morals, this is Milania a la Real Housewives of New Jersey:


Seriously, watch the whole thing and get ready to laugh/scream.

If you ever need a laugh, hop on over here and start rolling. 

Third source: Young House Love


These super famous bloggers have a similar mission as Ben and I; making their house a home by doing most of it themselves. They're awesome for inspiration and commiseration. They don't sugar coat their projects. Their house looks livable, but also perfectly styled. They're coming out with a book this fall, and I'll be first in line to pick it up.  

What's inspiring you lately?

Thursday, July 19, 2012

Resources, a round up of sorts [part HARDWARE]

Welcome to day two of my resources round-up. Today, house junk stuff hardware. 

Ben and I are totally making it rain on the economy right now.


But, we don't want it to rain any more than we have to. Our philosophy with the house is, "We only want to do this once. Seriously." The 'Seriously' is really important to our mantra. We're buying things that fit in our budget now, but will hold the test of time and style throughout the time we are in the house and hopefully whoever buys it from us in 2090. 
Flooring is a major part of our near-term plan. We did a HUGE amount of research, and we found the best deal and quality from Lumber Liquidators.  Specifically, we are buying a beautiful engineered hardwood floor from Virginia Mill Works. 
right here. 
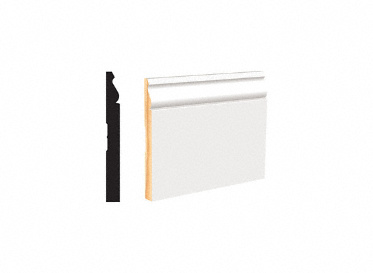
It's a cinch to install [at least it sounds that way...] and should be in our possession early August for installation. It's free shipping if you pick it up at their warehouse and for about 800 sqft of floor + pad + replacing all the baseboards our bill is going to be about $4,500. Not bad for a floor of this quality and prettiness!
Oh, and just so you can see our beautiful baseboards:
right here
The next big project we have going is replacing all our chintzy light fixtures. Again, they were probably all the rage (or cheap) at one time. They've definitely served their purpose and it's time to get something that reflects our style.
I love art-deco style, and have found some amazing things at Rejuvenation Hardware. Like this pretty:
right here.
Also, Rejuvenation was started right here in Portland. They have countless combinations of every fixture (including NICE LOOKING BRASS. EHMEHGERD.) I need to make a trip to their shop and stop oogling online.
I've also found some great things at School House Electric. They are also based here in Portland and have a shop RIGHT next to Lumber Liquidators. Found this little pretty there:
right here.
Imagine three of those lined up next to each other. Oh gerd, juss stahp.
I'm still pretty committed to trying to use local re-use/recycle shops like ReStore and Scrap for a lot of our fixtures and hardware, but it's nice to get a good idea of what I am looking for from Rejuvenation and School House Electric.

Tomorrow, part three of my resources round up: what's inspiring me lately!

Wednesday, July 18, 2012

Resources, a round up of sorts [part FONTS]

It's been a while since I've done a big resources round up! Today through Friday, I'll share with you a couple of my favorites in the world of fonts [typefaces if you're nasty], hardware for your house and sources for inspiration. But first, fonts!

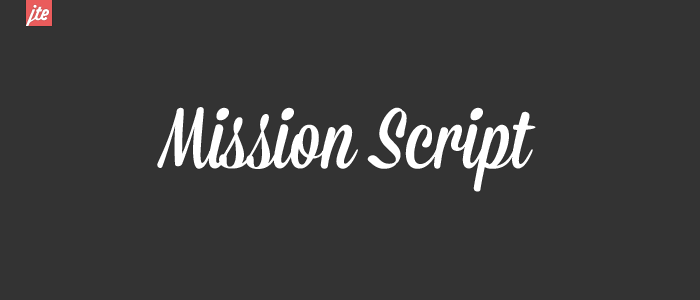
The Lost Type Co-op released a couple new favorites on Monday of this week. I used Mission Script for my mailbox:

Right here
I've also been mildly obsessed with the font Memoriam. This pretty little thing has top billing on the blog design this month and was also featured in the Bridal Shower invites I designed for a friend. This one costs money but is totally worth the $50 for all three options.

Buy the font here.

Look at the full project I did here.
Another free favorite: Lorena. I'm featuring this pretty thing on a top-secret project that I'll share with you mid-August [I kno, long wait, but totally worth it--hint, it involves beer.]

This guy is best used sparingly and increasing the kerning [space between the letters] a bit.
Download it here. 


Monday, July 16, 2012

My mailbox is ugly.

Ben and I have an incredibly ugly mailbox. And by incredibly ugly, I mean it is covered in moss, falling apart and the door won't stay open. It's just sad.

So, I bought a $10 mailbox from Home Depot in hopes that I could transform our post-receptacle to something of moderate beauty. Today, I designed the stencil I'll use to paint the thing:


And yes, it isn't your eyes, it's a little off center. I measured the mail box, and I want it to line up with the area not covered by the door because I have a little something special planned for that little door. It rhymes with fetallic smold.

Check back next week to see the finished product, yee!

Sunday, July 15, 2012

Bathroom, revisited.

Aw, here it goes!

This weekend, we committed to transforming our bathroom from something that was only functional to something that was palatable for the near future until we were ready [and willing] to do a full remodel. 

We spent 12 hours and $121 [yeah! under the $200 budget!] and are thrilled with the results. 

Just for reference, here's what we started with [please excuse the iPhone photos, I swear I'm in the process of getting a big girl camera]:

White walls, at this point I ripped [literally] the doors off that cabinet.

Also, for reference, the paint is white. I don't live in a sepia home.

Here are those doors.
They were rusted shut. Nice, right?
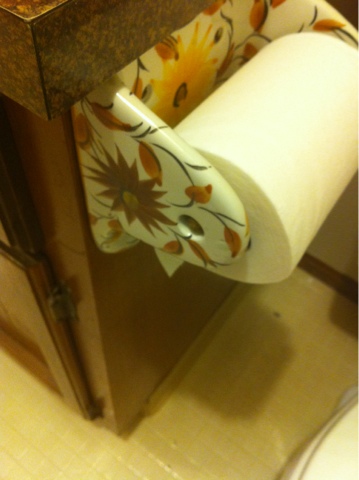
These were the bathroom accessories.
I'll just say...they weren't my style. Sorry, ceramic sunflowers.
Someone else will love you.

So, I gutted the place [figuratively] and got to painting. Painting bathrooms is awesome. Why? Because they're little.

I can't wait for the day when I can get through a weekend without cleaning out a paintbrush.

We decided to paint the walls the same gray we used for the hallways. It's an awesome neutral and looks wicked-awesome with the white + brass thing I have going on. [I really wanted to find a way to say AWESOME again...]

Also--lookahtthat hardware! Yeah!

So, you might be saying to yourself, why no towel rod?

And I say, "towels dry weird when they're on towel rods" And, this looks awesome:

These pictures really aren't doing the bathroom justice. Sorrys.

Bye, bye Sunflowers. [I'll fill those holes up later when I paint the cabinet white.]
Now that all the painting was done, I got to play around with accessories. First, I went shopping around my garage and found some great stuff from my wedding that I used as a fun thing:

Hint for brides-to-be: Pick wedding colors that you would want to put in your house later. Let's be honest, you bought a lot of crap for your wedding decorations--might as well be able to use it later.

And no, drying your bouquet doesn't count. Nice try. 
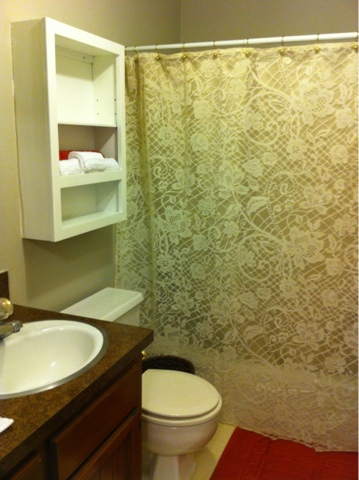
Found an awesome lace shower curtain off of Amazon with brass hooks [yes!] Painted that ugly cabinet, filled it with guest towels and tied it all together with orange bath mats. Yeah!


I'm going to steal a nice camera later this week for Tutorial Tuesday, so I'll take better pictures eventually, but I was too excited to show you!

here is my cost breakdown:

Hardware (towel hooks + toilet paper thing): $35 (Home Depot, made by Delta)
Paint (already purchased...but if I had to buy 1/2 gallon of Miller Paint): $13
Shower Curtain + Hooks: $16 (Amazon)
Towels + Bathmats: $50 (Ross and Amazon)
Soaps and Lotion (pretty ones of course): $7 (clearance at Homegoods)
Random Accessories: $0 (from my garage)

Grand total: $121

So proud! This is definitely a space that we can't wait for our guests to use, and will tide us over until we have the time and energy to gut it!

Have a great week, all!